Wednesday, April 24, 2013

Banana Bread and Cookie Snakes

We had to bring snacks in for church this week and I was feeling particularly lazy (I had to make cookie snakes for a term project, presentation, I'll talk about that later) so we picked up a coffee cake and I made a loaf of banana bread. The banana bread is pretty straight forward, the cookies are less so.

Banana Bread

There are a couple of variations that I included in the recipe but not in the this loaf (the as-is loaf was a hit with my church so I'm not sure the additions are needed)


3-4 RIPE Bananas, mashed (this means going brown, not this side of green)
1/2 C Butter, unsalted, melted
1 C sugar, granulated (though brown would probably do well, too)
1 t Vanilla (or a combination of Vanilla, Rum extract, etc. This loaf has a 2:1 ratio of Vanilla to Rum)
1 Egg, beaten (in a separate bowl/mug)
1 Pinch Salt (regular iodized,  not Kosher/Sea/Flaked/Himalayan)
1 t Baking Soda
1.5 C Flour, All purpose
1/2 C Chocolate Chips, semi sweet (optional)
1/4 C Pecans, Chopped. (optional)

Preheat oven to 350 and grease a ~4"x8"' loaf pan (I use the wrapper of the butter since you don't need a lot of butter to grease)

With a wooden spoon, mix the mashed bananas with the butter in a medium to large bowl. Add the Egg, Sugar, and Extracts. Stir. Add Salt and Baking Soda. Stir. Add Chips and/or nuts. Stir. Add Flour. Stir.

Bake for ~45-60 mn (usually closer to 45). Loaf is done when golden on top and a skewer/knife inserted and pulled out comes out without goop and a few crumbs (clean means it's over cooked).

Let cool in the pan, uncovered. Can be kept for several days, covered, in the fridge. I would recommend pre-cutting/removing from the pan before serving since it can be rather soft.

Cookie Snake
Adapted from Peppermint Plum's Sugar Cookie

We were presenting on a museum that had an exhibit called "Why did it have to be snakes" (or something like that, it wasn't important to the project) and instead of a more complicated (to carry) treat, we decided to do cookie snakes. Here's how I did my batch:

1 C Butter, unsalted
2 C Sugar
2 Eggs
3 t Vanilla
1 C Sour Cream
1 t Salt
2 t Baking Soda
5.5 C Flour, All purpose
0.5 tube green gel food coloring
3 drops each, red and blue food coloring

In a separate bowl combine the dry ingredients.
Cream Butter and Sugar. Mix in Eggs and Vanilla. Mix in Sour Cream. Incrementally mix in the dry ingredients (use 1/2 C increments or else your kitchen will turn white). Add the food coloring (or omit if you want regular sugar cookies). Mix thoroughly. Cover and refrigerate for >30 minutes.

Preheat oven to 375. Pull cookie sheets, line with greased parchment paper or silpats.

On a clean surface, powder lightly with powdered sugar. Pull a baseball sized lump of dough from the fridge. Roll into 1/3" wide lengths. slice them ~6-7" long and on the tray, create your snake. Good rule of thumb we found is: 2 Squiggles is a worm, 3-4 is a snake, even squiggles are intestines. Taper one end into a point and create a lumpy "head" at the other end.

This batch was more than 6-7", they expand too much for what I wanted

 Bake for around 5 minutes, though they may take longer. Watch for the top texture to change but pull before the edges brown. A little tan is okay.
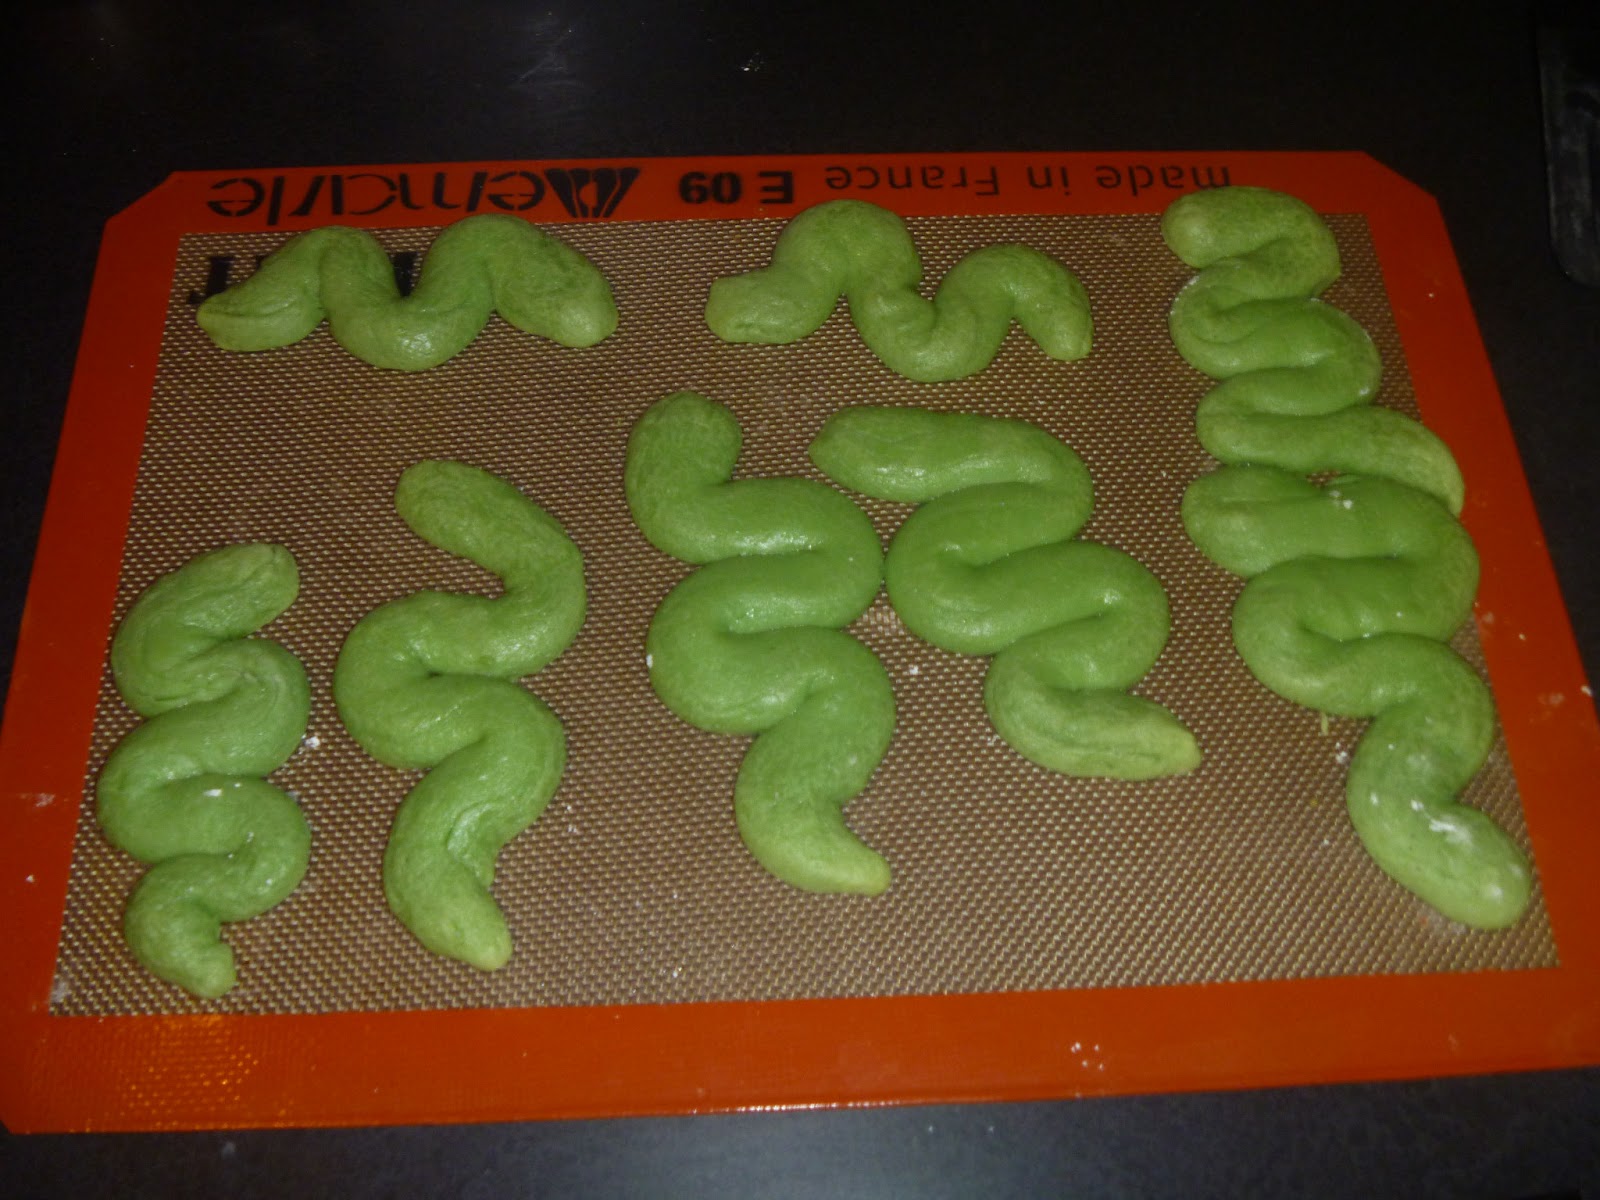
See? Expand too much.

Let the cookie cool for 1-2mn on the tray then pull silpat to cool more. Then transfer to paper plates or whatever to cool completely. At this point your can freeze or ice the cookies. To freeze, place in a tupperware type container and put parchment or waxed paper between layers.


Icing
Barely Adapted from Alton Brown's Royal Icing

One of my teammates just picked off the icing and ate that so I guess this wouldn't be in line with the royal icing I grew up using for gingerbread houses

Yellow Gel Coloring
3 Egg Whites (if you can find pasteurized egg whites, use that- roughly 6 T, I think)
~4 C Powdered Sugar
1 t Vanilla/Almond Extract (whatever flavor you feel like really)

If you are using unpasturized egg whites then I've been told you just need to heat them in a saucepan until warm (careful not too cook though) or you can risk salmonella, whichever. Moving on.

In an electric mixer, combine the egg whites and vanilla on medium speed until frothy. Add the powdered sugar in small ammounts until all combined. Mix on medium-high until stiff peaks form (8 minutes or so). Immediately transfer to sealable containers until ready to use. Make sure to have cookies are room temp before icing.

If you are adding coloring (I use 3/4 tube of yellow) add that into the frosting and mix thoroughly. Transfer to a piping tube. I may recommend 1-1 1/2T of liquid to thin it all out since it was a little too firm for my liking.

These were the rejects because of the wonky stripes/eyes but you get the idea.
I used one of those writing gel tubes for the eyes, they got everywhere, oh well, the "directors" thought they were adorable. 

Friday, April 19, 2013

Custom Bookcase... I mean Shoe Rack

I've been meaning to post this since the peplum post but with Boston and then what happened in West, other things took priority.

I could not get words right this past week- this shoe rack was called everything BUT a shoe rack.
Anyway, DH seems to be on a mission to replace as much possible of our furniture with DIY pieces. And for this piece at least, this made sense.


Sunday, April 7, 2013

Summer Print Peplum Top (Salme's Peplum Top)

I'm trying something a little different with my formatting, hopefully it will be easier to read.
Also, it's been too cold to wear this top, thus the delay in pictures. Techinically, it's still too cold, I threw a cardigan over this for church today.  Anyway, it applies to Project: Professional.


I promise I looked more put together at church- the wind was gusting all morning and I gave up.
 (Also, that boot top is part of our latest home improvement project I still need to get pictures of)

Thursday, April 4, 2013

How I do Menu Planning

It seems like every blog has a food planning entry so I thought I might as well do one as well (and it's still too cold to go outside in my peplum top, which has been finished for weeks; at this rate it will debut at DCLX at the end of the month). We go by weeks generally, we have a large enough pantry and fridge that we can keep everything, this wouldn't work with a dorm (unless you're like DH and manage to sneak a full size refrigerator up the elevator, past several CLs, and store in the suite all year).*


Step 1- Figure out what days you are making something and if there are any stipulations (fast, late, etc)

Step 2- See if there are any meals you forgot to make last week (it happens, don't worry) or food that's nearing the end of it's shelf life (do the float test for any eggs, please, don't guess)

Step 3- Go through your favorites/pinterest board(s)/recipe books/recipe box and pick out recipes you like and fit your time. Keep in mind how many servings each recipe makes for your household (generally with DH it's 2 for every 3 it says in the recipe depending on the source, my Scandinavian cooking books tend to be closer to 3.25 for ever 3, go figure)


Step 4- Spell out all the ingredients of each recipe. Then eliminate those you already have on hand.

I didn't do it here, but list what kind and how much of each ingredient

Step 5- Look at what you need beyond what is needed for the preplanned meals

Step 6- Combine all meals into a department by department list (try and list them by how show up in the store, I can do it for HEB and Harris Teeter but still can't get Trader Joe's). Remember to mark how many you need, and if you need it for more than one recipe

Step 7- print, email, whatever. Make sure you have it at the store.

*I'm not kidding, and this is before I knew him or he would have gotten my "disaproooval" face.

Saturday, March 23, 2013

Quick Update

Apparel sewing has kind of taken a back seat because....

My cousin is expecting!
It's the first great- grandbaby for the family (and second generation to be born exclusively in the US). My mom and I are teaming up to make a modern-outdoors version of Amy Smart's Doublecross Quilt. I've never made a quilt this size and mom hasn't quilted in a couple years and we're hand quilting! The goal is to have this finished by the baby shower in June so I may disapear for awhile.

The peplum top is complete, just need pictures (was going to wear it dancing tonight but may just wear it to church tomorrow if it's not too cold.)

Katniss shirt still needs buttons and button holes. May take in the shoulders a bit too.

I have a pair of grey slacks from DH to refashion into a skirt.

My suit pants still need a hem.

For no good reason- Olive making a face

This is after I finish the three papers, two projects, and two presentations by the end of April.

Oh, and we still haven't figured out Ms. Fluffy Pants' show name, so those papers still need to be submitted. Then we need to start preparing for the instinct test in the fall (her 'stop' could use better brakes)


Thursday, March 14, 2013

Crème Brûlée French Toast

Smitten Kitchen (Again)

Basically, it's a rich version of French Toast. If you soak it as long as she says, the center is nice and custard-y. Good with strawberries and whipped cream (minimal amount of sugar, you don't need it with this one). If you can get the brulee part right, it looks fancy (if you don't burn the sugar...)

First time I made it I used pretty exactly her recipe and have barely tweaked it since (not that we have french toast that often, Saturday is a rare sleep-in day so it's closer to lunch than breakfast when we wake up for the last time and neither feel like doing more dishes).

 Old plates and mismatched silverware, has to be at least two years old. 
Probably should replace this at some point....

Things I changed:
-          We usually omit any orange flavoring (does add something but not totally necessary)
-          We always omit alcohol (see my comments on RoastChicken)
-          We use whatever bread looks good at the store, even the weird thin-sliced sourdough that DH likes
-          The sugar topping is good but a bit fiddly and when you are as accident prone as I am, not worth it for the injuries ensued
-          I rarely soak them more than 30 minutes. I love the custard center (I had a great version at the U.S. Grant Hotel on our honeymoon that was very similar using squares of brioche) but DH hates them


Tuesday, March 5, 2013

Introducing Project: Professional

The other day we (DH and I) started to analyze our closet contents. I should have done this awhile ago, it could have dictated my sewing/purchasing priorities a bit more. Maybe my sewing more than purchasing (see: Olive joins BUGWB) but still useful. And this got me thinking more about what I need to consider when planning my wardrobe for my early professional years, especially tops.
  • There's a bit of a dichotomy in my preferred position - we need to go from rooting (carefully) around storage areas, that range in condition from immaculate to grubby, back to the office setting for committee meetings and sometimes speaking with the public.
  • I need a balance between a suit (too much) and jeans and a tee (makes me look like I belong in a freshman seminar class).
  • I really need to consider the cleavage-y factor, especially since not only am I short but my shoulder to full bust measurement is shorter than most RTW tops and most patterns account for. As easy as it is to ask DH to check in the morning, I'm getting up at 5-6 in the mornings for my next internship and he is not a morning person. So, I need to think about this ahead of time.
  • I own way too many cardigans (lazy way out) and college tee shirts (unprofessional), and too few go-between tops that I can dress up or down.
  • I have very few professional prints and that's a nice place to add interest (the lack of "interest" is DH's pet peeve with my outfits). I'm not a big floral or animal print person so it's a matter of finding non-kitschy, more geometric patterns.
  • I really don't care for "trendy" or "in" styles so much as flattering, comfortable, and professional. If it's seen as fashionable, yay, but not necessary.
  • As much as I like the idea of sewing more of my own things, I need to be cognizant of the actual  costs. So I should probably go RTW if a decent quality version* can be bought for significantly less than it would cost me in time, fabric, and extra materials (different interfacing, presser feet, etc).
I've found a couple of options for patterns for the next few months**

Sewaholic's Renfrew. People seem to have great results with the pattern and it allows for some go-between knit tops. Already have the walking foot and biased interfacing tape. Good place to use professional prints. 

Burda's Flared Godet Skirt. I don't really need many skirts but I need something between my suit skirt and the fun prints that DH hates that are good for dancing. I'm thinking a blue twill or grey tweed. I already have a couple yards of grey bottom weight suiting I could piece together for it.

Colette's Ceylon. I have some major fit issues with it when I made a muslin last year and shelved it for awhile. Has potential as a top but it might be too unique to be a TNT pattern. I do want one in Baylor green.

Sewaholic's Alma. There are enough neckline and sleeve variations that it could become a TNT. I really like the neckline from view A. Another place to use prints

Salme's Peplum Top. Actually working on a summer version in a geometric print. The measurements (except for the distance from shoulder to full bust) were spot on. Like the Ceylon may be too distinctive, and maybe too trendy. Are peplums even "in" anymore?

Not Pictured:
Colette's Taffy Blouse from The Colette Sewing Handbook. Not in a sheer fabric like they suggest but I like the idea of the sleeves. I want the book anyway. The Licorice Dress is a possibility too, but the lack of a waist scares me a bit.

Vera Venus' 30's PJ Top. She drafted it into a dress as well so it's not distinctively PJ-like, and I had a top similar that we got rid of when I decided I was not going to settle for subpar fit. Will probably need a FBA to fit perfectly but the starting measurements aren't too far off.

Folkwear's Armistace Blouse. Blousey but I think could be nice for muggy summers- I'm thinking a pretty swiss dot with some of the lace we picked off my mom's wedding dress the other summer.

* I don't mean thin knits that tear and pill quickly, I mean quality fabrics, good construction, etc.
**Or the roughly 436 days until I get my hood, provided I pass my comps. Not that I'm counting or anything.